Intermediate Jumping Techniques
Table of contents
- Intermediate Jumping Techniques
- Emote Gates
- Emote Slides
- Void Jump
- Phasing
- Ghosting
- Example: Fake Ghosting
- Example: Ghosting
- What Causes Ghosting?
- So what is the point of Ghosting?
- Example: Ghosting Failed Timed Jump
- Example: To do timed jumps correctly like in the examples below, it is helpful to try and line your jumps up so that you can hit both fairly consecutively with little to no downtime between jumps.
- Example: Ghosting Save
- Example: Another application of Ghosting is the ability to jump through otherwise solid items. In the example below, jumping pushes your character high enough that it triggers the Ghosting sequence to happen and for items to start disappearing, thus making a wall that you can jump through.
- Example: Invisible Platform
- Example: Making an item disappear so that you can walk into it enough to trigger an upwarp once it regains its collision.
- Bodybangers and Headbangers
Emote Gates
Emote gates are a distinct feature in jump puzzles, allowing you to employ emote commands like /sit or /doze to transport yourself to a chair or bed, or even pass through otherwise impassable areas or objects. While there are various forms of emote gates, doze gates are the most commonly encountered version in puzzles.
It’s crucial to keep in mind that if you’ve phased through any furniture, you won’t be able to use any form of emote commands on housing furniture. However, in cases where this issue arises and you can’t move far enough away from the problem furniture that was phased, simply exiting the room and re-entering it often resolves the problem.
Puzzles that require emote usage will be marked with “E” for emote in its subtypes.
/Doze Gate
Doze gates are the most prevalent versions of emote gates found in puzzles. This is because they offer the ability to pass through the walls, ceiling, or floor of the housing cube, bypass other partitions and furniture obstructing the way, and even traverse a void wall that would otherwise be impassable. All you need to do to complete a doze gate is to be close enough to a bed and use the emote /Doze.
Example: Doze gate being used to pass through a gaol partition
/Sit Gates
Like Doze Gates, to do this one all you have to do is be close enough to a chair and use the emote /Sit. Sit gates are less commonly employed because they possess limited capabilities to move people through objects. However, they still hold the ability to cross sections of the void and, if there’s a gap between objects that isn’t spacious enough to accommodate your character model, it might be possible to navigate through it using the /sit command.
Example: Sit gates that cross sections of the void.
Example: Sit gate through an opening that would otherwise be too narrow to cross.
Sit / Doze Jumps
These emote gates are less frequently encountered in puzzles due to the complexity of creating jumps that function correctly. Among them, the /sit jumps are the simplest to execute. In these instances, a chair is partially embedded in a wall or another object, and by sitting in it and subsequently jumping, you’re effectively teleported to the top of the item, somewhat resembling an upwarp. The act of jumping will trigger the game to teleport you up whereas simply walking off the chair will not.
Emote Slides
Emote slides, much like emote gates, are initiated by using emote commands such as /sit and /doze on beds and chairs. However, another method of triggering them involves returning to the front door and resurrecting within the puzzle (typically after using Blue Mage self destruct). Emote slides occur when wall furniture, either wedged through multiple walls or pressed against or close to objects to which it can snap to, abruptly alters its position when any of the triggers are activated. It’s important to note that the furniture’s position change only appears on your screen and isn’t visible to anyone else who may be present in the room.
If a puzzle requires the use of emote slides, it will be marked with “E+” in its subtypes.
Slides
The initial type of emote slide is referred to as a Slide or a Lock. In this scenario, the wall furniture gradually snaps to each adjacent wall one by one with each activation of an emote, until it’s unable to proceed further. Puzzles can employ this technique to establish surfaces for jumping after you’ve completed a series of steps, or to block access to certain paths if you’ve used emotes or returned to the door too frequently. To reset these slides, you need to exit the house or room entirely and then re-enter.
Example: Slide tech being used
Pumps
The next type of slide is known as a “Pump” because two wall furniture will toggle between snapping to each other and to an adjacent wall. Using emotes will change the state back and forth between the two. This variation is considered a more forgiving approach in many puzzles because it doesn’t require you to exit if you make a mistake.
Example: Pump tech being used
Void Jump
Void jumping is a distinct form of upwarp that capitalizes on the empty black space beyond the boundaries of the housing cube. To execute this jump, you’ll need to find an area off the side of the housing cube where there’s nothing but the black void directly in front of you, with some furniture positioned directly above you. By running straight forward for about 3 seconds without any movement to the sides and then jumping, the game will transport your character to the item located above you. This technique enables you to cover significant vertical distances.
However, it’s crucial to note that very few puzzles are designed with this technique in mind, and it’s often prohibited. Therefore, it’s essential to confirm that the puzzle you’re attempting is marked with the subtype “V” for Void Jumps before trying this kind of jump within the puzzle.
Example: Void jump, also showing that you cannot just jump up regularly otherwise
Phasing
It’s possible to run in place at furniture for long enough to eliminate collision with both the item you’ve run at and the item beneath you. This process is known as “phasing.” It’s easiest to do when running into two different items that form a corner, ensuring your character remains stationary while moving forward. However with enough practice and precision, you can hold your character steady enough to phase through even singular curved surfaces. Once you’ve successfully phased through an item, it will remain in its intangible state until you move a certain distance away from it. Different furniture items will have varying ranges for becoming solid once again. Some items like Pipes and Enigma Partitions have especially long ranges that they will remain phased at.
It’s important to note that much like void jumps, phasing is a technique often prohibited in many structure puzzles. It can allow access to areas of puzzles that were unintended and can be considered cheating. Always review the puzzle subtypes and rules before attempting to phase through furniture in puzzles. If you encounter a puzzle marked with the subtype “P” for Phasing, it’s an indication that the builder has intended for phasing to be used in some capacity, so feel free to use this technique in those puzzles.
Example: Normal phasing.
Ghosting
Ghosting is one of the latest tech discoveries in the realm of jump puzzles. It can be described as when furniture in a puzzle can be triggered into unloading and reloading in a specific sequence. Ghosting has similarities with Emote Slides in that anything that is happening on your screen goes on for you and no one else around you. It cannot be overstated that Ghosting happens entirely client side. It is completely unaffected by ping or the strength of your computer’s hardware. The results of Ghosting are the same regardless of any setup you may have.
Before attempting one of these puzzles, it is very important that you follow these steps so you can see your surroundings properly!
To view a ghosting puzzle correctly:
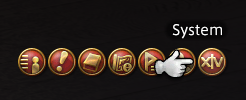
Go to the System Menu
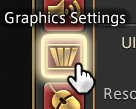
Graphics Settings
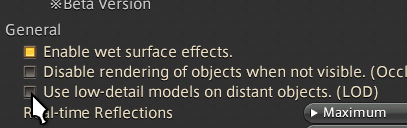
Disable LOD Make sure the option “Use low-detail models on distant objects. (LOD)” is unchecked.
The one caveat to Ghosting is that sometimes it can be hard to tell if items in a puzzle are Ghosting or if your graphics settings are just not tuned right. The game features a setting that utilizes low-detail objects for items at a distance. However because the game lacks low-detail representations for housing furniture it will make it seem like certain items are disappearing, even when they haven’t actually been unloaded. Furthermore, these “fake Ghosted” items will still have their collision intact, unlike what happens with genuine ghosted items. All puzzles that are big or tall enough will show items disappearing if you leave the LOD setting on. Please note that this is not actual ghosting, only puzzles marked with the subtype (G) or (G+) will feature this tech. Avoiding confusion on what is or is not ghosting is the reason why it is so important to make sure you have the LOD setting turned off.
Example: Fake Ghosting
Here you can see how most of the surroundings will disappear with the LOD setting on, items will also disappear as your camera rotates. This is NOT true Ghosting! The items here, though they might disappear, still have collision.
Example: Ghosting
This is what the same puzzle looks like with the LOD setting turned off, and also an example of what Ghosting actually looks like.
What Causes Ghosting?
Ghosting is dependent on two factors, where your character is in the void, and where furniture has been placed. The second your character model passes 100 yalms away from another item in the void, furniture will start to unload in ticks of 5 furniture at a time. The reason why this happens is that the game remembers the order in which each furniture item was first placed down inside the housing space. When the game starts to unload an item that is 100 yalms away, it also proceeds to unload every single item placed down after that one as well. In this way builders can manipulate what gets ghosted. Additionally, knowing that the game unloads 5 furniture at a time, the builder can even manipulate when in the sequence the item will disappear as well. Ghosting ends once your character goes back in closer and is no longer 100 yalms away from another item, the items will then reappear all at once.
It is possible to see Ghosting out in normal housing wards as well. Items out there work the same way in that if things are more than 100 yalms away they will start to unload. This can be a handy tool if you want to judge the distance apart things need to be to trigger Ghosting.
So what is the point of Ghosting?
While ghosting doesn’t require the player to do anything that is too out of the ordinary jump wise, Ghosting furniture serves several purposes in jump puzzles and it is good to recognize the technique when it is happening. It can be employed to establish forced or alternate jump paths, create timed platforms requiring a player to run and jump across fast enough, it can allow players to jump or pass through otherwise solid objects, animate furniture elements, and reset slides and pumps without requiring players to exit the room, and probably much more yet to be discovered. This versatile technique enhances the complexity and dynamic nature of jump puzzles.
Example: Ghosting Failed Timed Jump
When taking too long jumping from timed platforms, the item beneath you can vanish oftentimes making you fall or warp down. These examples also show the walls animating as the ghosting sequence is progressing. Animations like these can serve as a countdown of sorts to show you how much time you have left.

Example: To do timed jumps correctly like in the examples below, it is helpful to try and line your jumps up so that you can hit both fairly consecutively with little to no downtime between jumps.
Example: Ghosting Save
Occasionally when a timed platform disappears beneath you, jumping in place can make the item reappear. Another jump will then place you back on top of the item and restart the ghosting countdown, effectively giving you another try.
Example: Another application of Ghosting is the ability to jump through otherwise solid items. In the example below, jumping pushes your character high enough that it triggers the Ghosting sequence to happen and for items to start disappearing, thus making a wall that you can jump through.
Example: Invisible Platform
A different application of Ghosting is jumping to invisible targets that reappear as you jump down to them. Succeeding on jumps like these takes careful observation on what exactly is disappearing and whether it is a possible path to jump to.
Example: Making an item disappear so that you can walk into it enough to trigger an upwarp once it regains its collision.
These are all just examples of a few uses of Ghosting and are not an exhaustive list. There are other examples of ghosting not pictured here and I’m sure we will find many more uses for Ghosting in the future.
Bodybangers and Headbangers
In jump puzzles, you might encounter obstacles known as “Bodybangers” and “Headbangers,” which can disrupt your jump and cause you to fall. Bodybangers affect you from the side, while Headbangers come from above. For Headbangers, it’s essential to adjust the arc of your jump in a way that allows you to avoid the obstacle. This might involve jumping early so that you land on the surface as you descend, ensuring you miss the object above. On other occasions, it might require jumping late enough to avoid a direct collision with the obstacle overhead. Mistiming these jumps can result in a fall, forcing you to restart the puzzle.
Example: Early jump to avoid a Headbanger
To navigate past Bodybangers, you often need to make use of your target circle. This entails moving as far as possible by adjusting your target circle’s position and then jumping so that your target circle barely catches an edge on the other side of the obstacle. This precise maneuver can allow you to pass the Bodybanger without crashing into it.
Example: Bodybanger